Nowadays, most Laptop or Pre-build Desktop PC manufacturers don’t reveal all the necessary specifications of their products. It is keenly important if you’re planning to upgrade your machine or want to sell some component for any reason. More than that, sometimes knowing the specs of your computer helps you to identify which software or game will work and which will not. So, in this article, we will find out the best way to check PC specs and to know each & every single part detail inside the computer.
Read More: How to Free Up Disk Space in Windows 10? More than 50GB!
How to Check Specification of Your Computer?
There are actually several ways to check PC specs. To know the basic details like which CPU do you have? which graphics card or graphics processor do you have? how much RAM is added? – you don’t even need any special program rather Windows operating system is smart enough to detect all of these details.
How to Check: Which Processor or CPU do You have?
So, if you want to know what kind of processor you have, you can easily find out that information on a Windows 10 machine. You just have to do a couple of clicks to know what CPU you have.
Right-click on the Windows Start Menu icon > Click on ‘System’.

Here you can find the information of your Processor in the ‘Device Specification’.
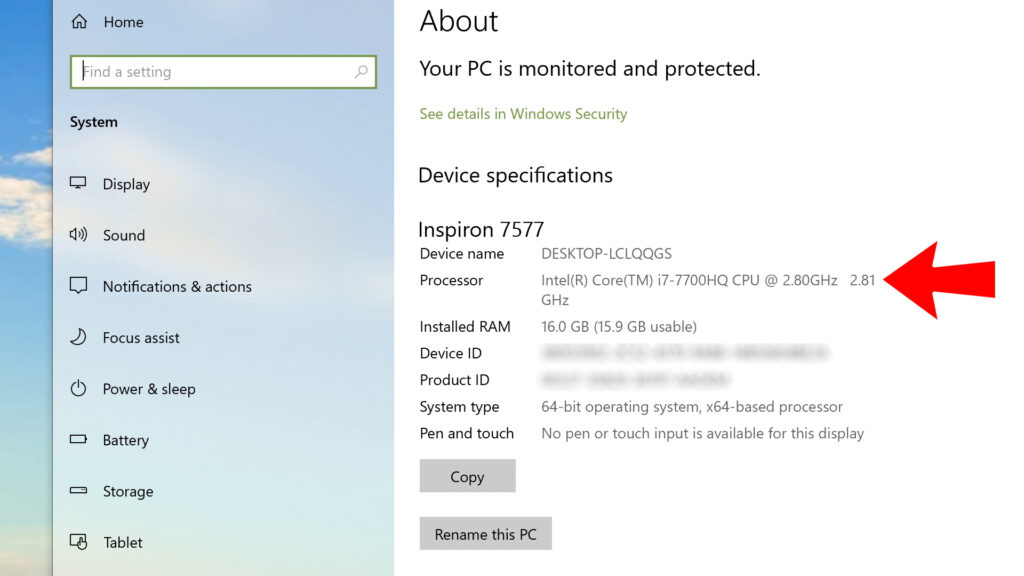
That’s it. Here, you can gather all the basic details about what processor is installed on your computer. For more information like how much load is assigned, at which frequency the processor is currently operating, how many physical and logical cores that processor has, how much cache memory it has – almost everything can be found in the Task Manager.
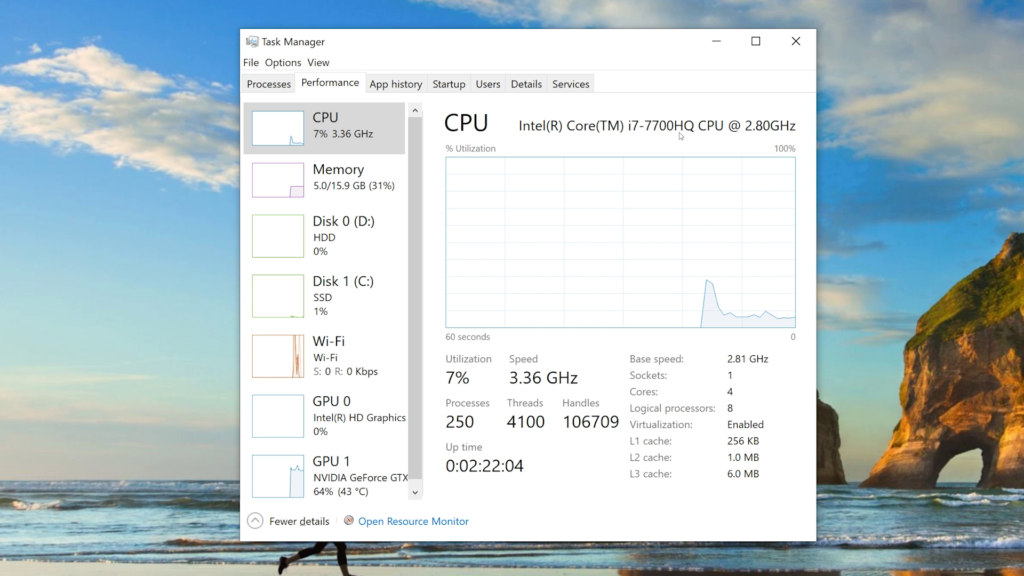
To open the task manager either you can just right-click on the Task Bar and select Task Manager or you can access it by pressing the Ctrl+Shift+Esc key together.
How to Check: What Graphics Card Or GPU do You Have?
If you’re a Gamer or a graphics designer or a video editor then having a good graphics card is crucial. Do you know what graphic card or graphics processor your laptop or desktop possesses? Easy, there are several ways to check what GPU you have. You can read it here.
Must Read: How to Check What GPU (Graphics Card) You Have In Your PC?
Still, I am going to tell you the easiest way. Right-click on the Windows Start Menu icon > Click on ‘Device Manager’.

Here, in the long list of connected hardware click on ‘Display Adapters’. Here you can find all the GPUs your computer has.

I said ‘GPUs’ because the integrated GPU of your processor is also listed here along with the dedicated graphics processor that you’re looking for. The dedicated graphics card is the more powerful one and in the ‘Display Adapters’ tab, the dedicated graphics card will typically be listed in the second option.
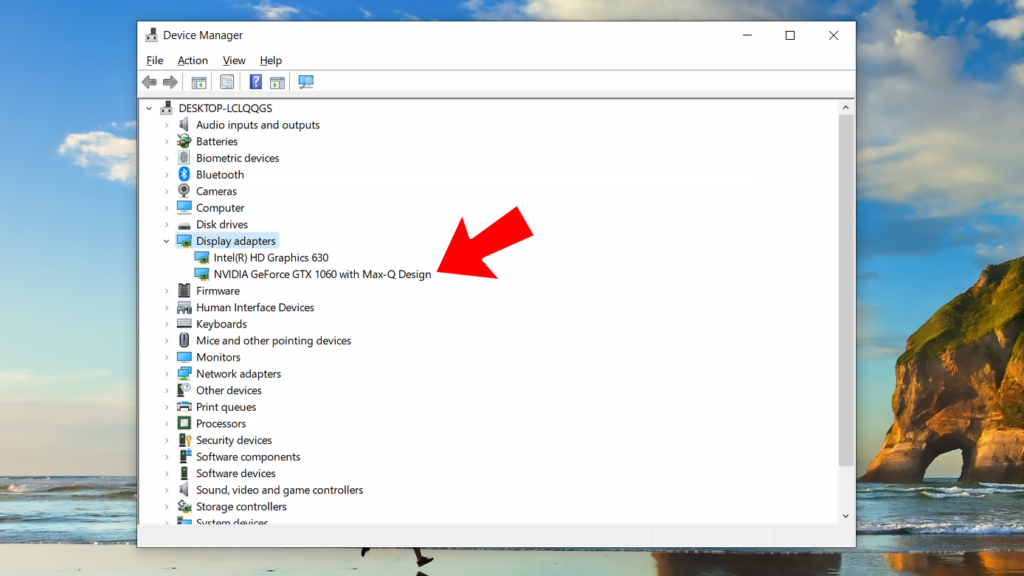
Integrated graphics mostly named something like ‘Intel HD Graphics 4000′ in case of Intel CPU and the dedicated GPU looks something like NVIDIA GeForce GTX 700M, NVIDIA GeForce GTX 1060MAXQ, or AMD Radeon (or HD) R9 M470.
If you have AMD CPU then the integrated graphics will also likely be ‘AMD Radeon…” which makes it a bit confusing if your computer has the from AMD too. In this scenario, mostly the 2nd option is your dedicated graphics.
How to Check: How Much RAM and Which RAM do You have?
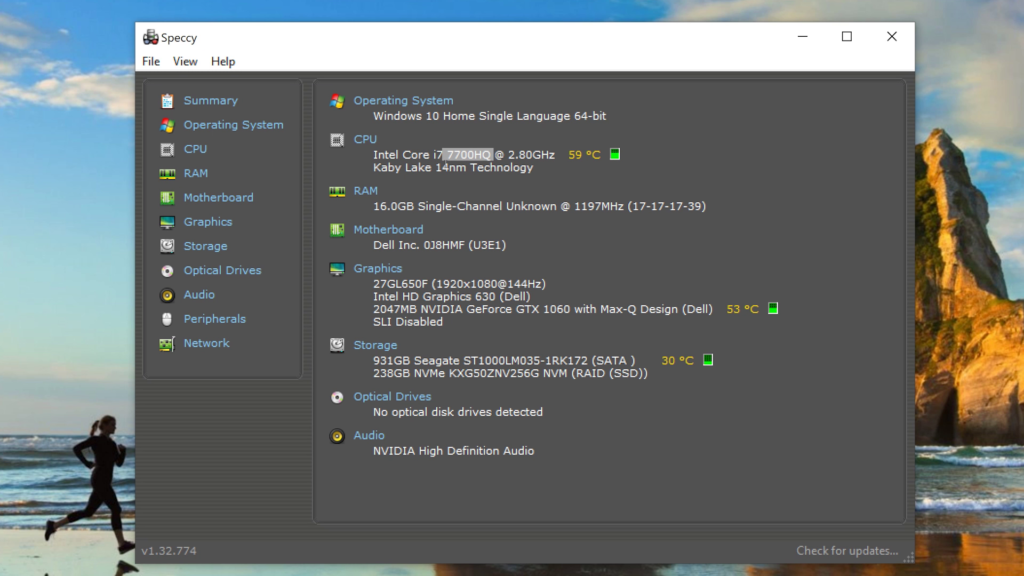
If you are just interested in how much RAM you have then Windows Task Manager is more than enough for you but if you are interested in detailed information like RAM timings, frequency and voltage then you have to go for third-party solutions. We personally recommend Speccy and HWMonitor. Both are really great tools and can show you everything you should know regarding each and every component your computer possesses. How much RAM your computer has can also be seen from the same screen that lists what CPU you have.
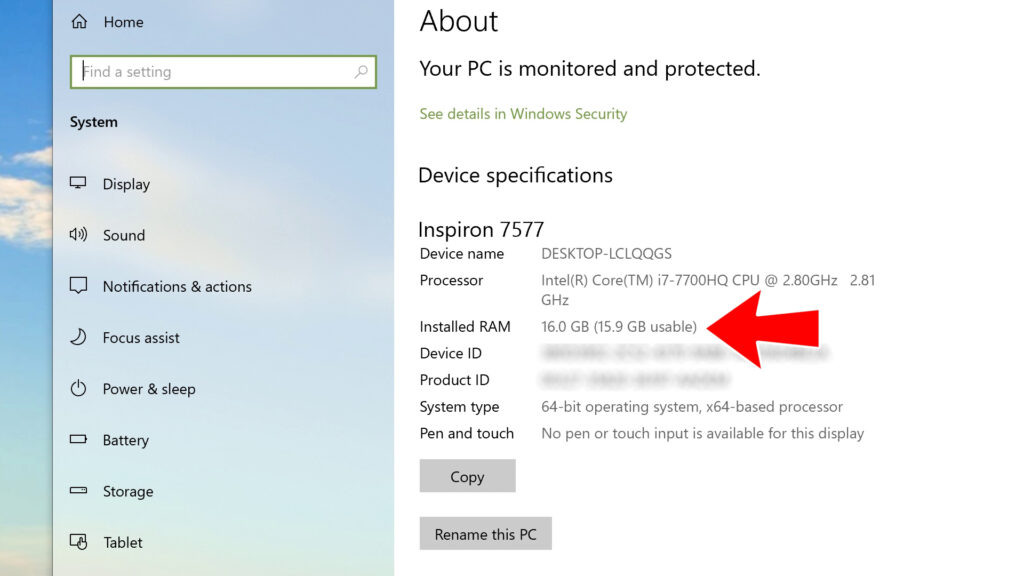
Right-click on the Windows Start Menu icon > Click on ‘System’.

Scroll down a bit you should probably see how much RAM you have.
How to Check: What Motherboard do You have?
Knowing about the motherboard capability is not so important until you’re thinking of upgrading something like Processor, RAM, or Graphics Card in your PC. For laptop users, you don’t have the freedom to upgrade anything instead of storage.
So, we are here just focusing on desktop users. For desktop users, knowing what type of motherboard you have means who manufactures your motherboard and what socket type and chipset it has, is quite helpful.
The first and the best solution is to open up your desktop PC and find the manufacturer name like Asus, Gigabyte, MSI, HP, or ASRock. On the motherboard, you have also seen Z370-A, B350M, or X370, etc. these are the motherboard chipsets and by knowing the chipset, you can definitely acquire the knowledge of which CPU socket your PC has.

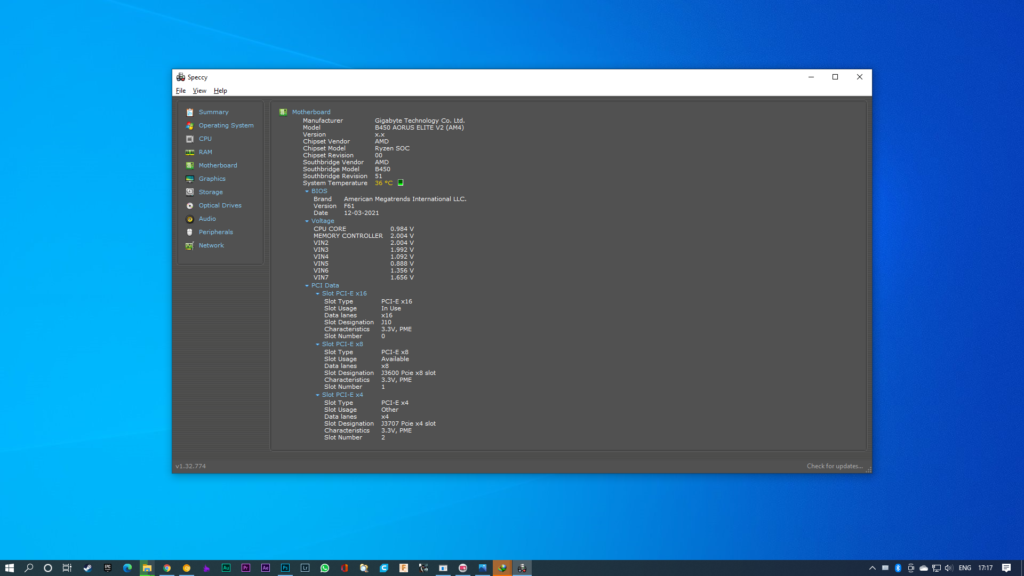
Want to know an easier option? don’t worry, install some third-party tools like Speccy, HWMonitor, CPU-Z, etc. They are pretty handy and capable enough to show you each and every detail of the motherboard your computer has. You can identify Chipset, Total PCI-E lanes, a Total number of SATA Ports, and much more! Here is the snapshot of my computer’s motherboard showing in ‘Speccy’.
How to Check: Which Power Supply or PSU do You have?
Knowing about the PSU is only possible by opening up your PC until the connected PSU has the capability to talk with the motherboard using USB. For most cases, you have to open up your PC case and find the label on the PSU. From here, you can identify the manufacturer of the PSU, Power Rating, Efficiency Rating, etc.
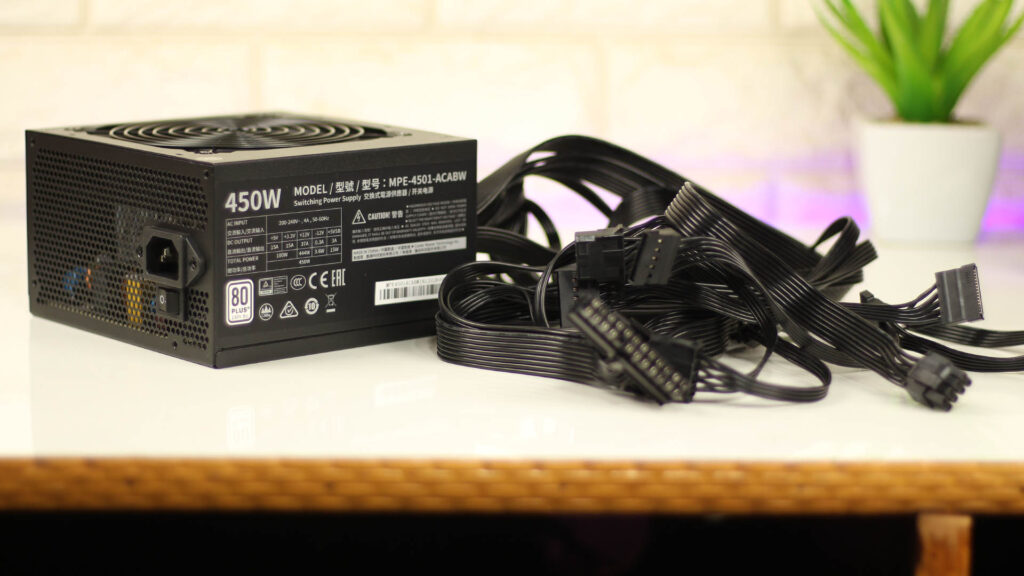
Remember, if you have opened your PC for PSU replacement then always buy a branded PSU for better stability and a better life for your PC.
How to Check Specs of A Laptop?
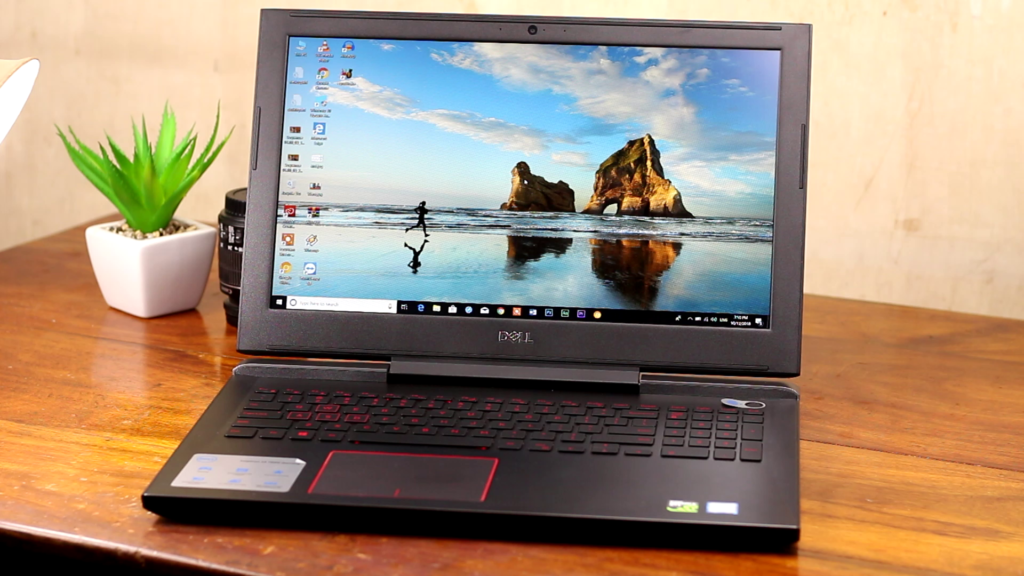
This post seems to look completely focused on desktop PCs but actually, these all procedures are applicable for laptops too. You can use all the third-party software to know about your laptops. Also, some information can be seen in Windows too.
Read Now: How to Connect Desktop Hard Disk to Laptop?
Don’t Upgrade Blindly…
So, you have checked your PC specs and think of upgrading something but keep in mind, upgrading isn’t so simple that you are thinking of. Not all CPUs work on all motherboards, not all kinds of RAMs work on all motherboards. There are several factors to choose components for your PC. When you’re upgrading the processor, you have to first check the socket type of your motherboard and have to buy that CPU that is designed for that socket. Also, you have to be cautious about the chipset of your motherboard. Not all processors work with every chipset even if the socket type is matching.
The same goes for RAM. If you are going to add another RAM stick then you have to know all the information like capacity, frequency, CAS latency, and Timings of the installed RAM and have to choose the symmetrical one otherwise you may face stability issues in your computer. And it’s better to choose the even same RAM from the same brand for better compatibility.
So, before upgrading anything there should be a lot of research to perform otherwise you may buy the wrong component and that may not work on your computer. Anyway, we hope you have found this article about how to check PC specs helpful enough. If it really so then don’t hesitate to express your valuable thoughts in the comment section below. Thanks for visiting & appreciating our work.

